ideanote
inCAD Library

Make sure to read this before use

What is inCAD Library?

  • Helpful application examples for mechanical engineers.

The Concept of inCAD Library

  • Online application library with a range of ideas for all manufacturing industries.
  • Save design time and learn new design applications when you are concepting new machines.

Disclaimer

  • MISUMI may not offer all parts in each application design. Available parts can only be purchased separately not as a unit shown in each application design.
  • MISUMI does not guarantee quality, accuracy, functionality, safety or reliability for the combination of the parts in each application example. Accept these points prior to use.
  • 2014 Copyright MISUMI
  • The data cannot be used for any purposes (including sales promotion) except for designing your machine.
  • All associated CAD is free. MISUMI reserves the right at its sole discretion to cancel, terminate or modify this offer.
  • MISUMI may change, add or delete application examples posted without prior notice.
  • MISUMI assumes no responsibilities for any damage incurred resulting from your use of the Service or any change, addition or deletion by MISUMI of the application examples for any reason whatsoever.

Features of inCAD Library

  1. Get great new design ideas for these application examples.
  2. Over 200 design application ideas collected from dozens of industries!

  3. Find application examples quickly! Search by function, workpiece shape, etc.

  4. Download the CAD models for each application example.
  5. Log in to download free CAD models.
    Download CAD for the entire application example!

Good IDEA! Button

Click the Good IDEA! Button when you like an application example!

*Can only be clicked once per application example.

  • Upper right corner on the page of application example details

  • Pop-up dialog for CAD data downloading

Back to top

inCAD Library Keyword Search
inCAD Library No. Search

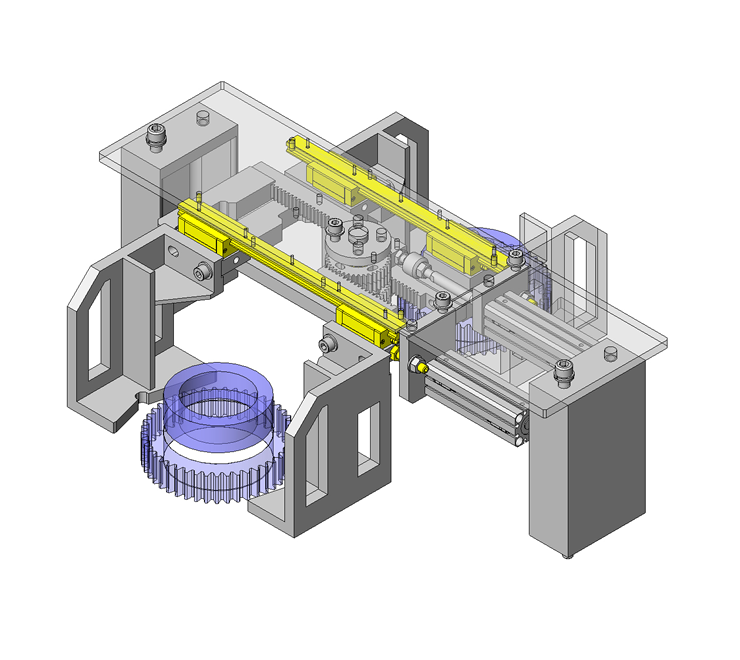
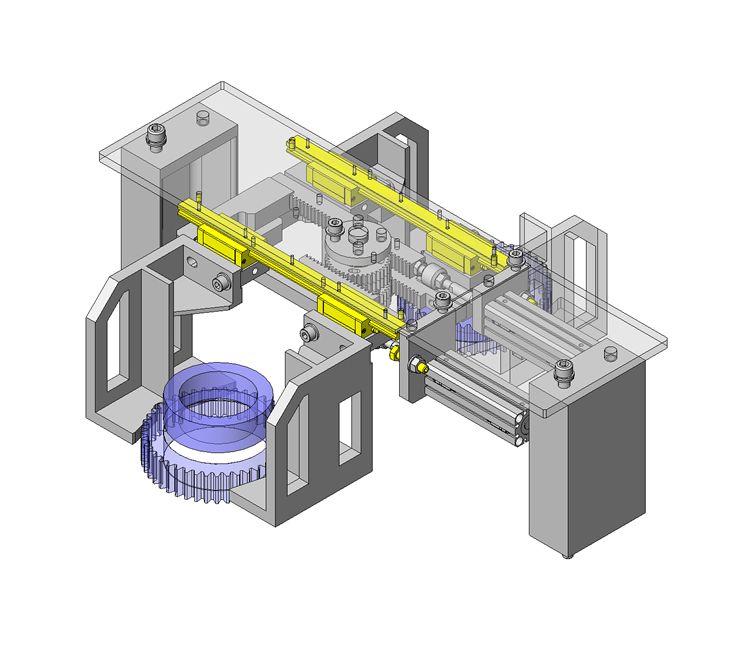
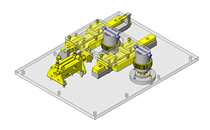
No.000156 Dual Centering Mechanism

Two parallel hands using two-tier rack and pinion.

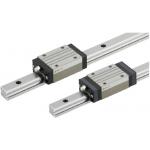
Linear Guides

Product name Linear Guides/Heavy Load
Part number SX2R24-280
* Orange colored cells in the table below indicate the part numbers used in this example.

Selection criteria

It has the suitable radial clearance and accuracy.

Back to page top

Available sizes

■Linear Guides

Material Hardness
Carbon Steel (Alloy Steel including SCM) 58HRC-

■Sizes and Dimensions

Number of Blocks Block Width Block Length Overall Height Rail Length
Standard With Lubrication Units
1 34 57 66.6 24 100-1480
42 67 76.6 28 160-1960
48 83 92.6 33 160-1960
52 57 66.6 24 100-1480
59 67 76.6 28 160-1960
73 83 92.6 33 160-1960
2 34 57 x 2 pcs. 66.6 x 2pcs. 24 160-1480
42 67 x 2 pcs. 76.6 x 2pcs. 28 220-1960
48 83 x 2 pcs. 92.6 x 2pcs. 33 220-1960
52 57 x 2 pcs. 66.6 x 2pcs. 24 160-1480
59 67 x 2 pcs. 76.6 x 2pcs. 28 220-1960
73 83 x 2 pcs. 92.6 x 2pcs. 33 220-1960

* Please see the product pages for details of selectable sizes.

Back to page top

Selection Steps

■Miniature linear guide selection steps

Determine the app. Conditions
(Moving body speed, feed rate, motion pattern, Life)

Temporary selection of linear guide specifications
(Temporarily select block type, height,
rail length based on the application condition)

Confirming basic safety
  • ●Load capacity
  • ●Life
  • ●Preload

Back to page top

■Accuracy Info

■Preload and accuracy standards (Normal clearance type)

Normal Clearance Type.

Overall Height Radial Clearance (µm)
24 -4-+2
28 -5-+2
33 -6-+3
Dimensional Accuracy (µm) Standard Grade High Grade
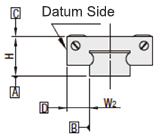
Dimension tolerance of H ±100 ±40
Pair variation of H 20 15
Dimension tolerance of W2 ±100 ±20
Pair variation of W2 H24 ・ 28 20 15
H33 30

■Running Parallelism

(μm)

Rail Length(mm)
81-250 251-400 401-500 501-630 631-800 801-1000 1001-1250 1251-1600 1600-2000
High Grade 7 8 9 11 13 14.5 16 - -
Standard Grade 7 12 14 18 21 23 25 27 28.5

*The slight clearance type has clearances (play) between the rail and blocks.

Back to page top

Performance info.

■Rated Load of Linear Guides for Heavy Load (Normal Clearance Type)

Overall Height Basic Load Rating Allowable Static Moment
C (Dynamic) kN Co (Static) kN MA ・ MB
(N・m)
Mc
(N・m)
24 8.6 14.2 69.0 98.0
28 12.5 21.3 155.0 232.0
33 20.2 34.5 275.0 393.0

Back to page top

Technical Calculations

■Linear guide life calculations

●Life
When linear guides operate in linear motion while supporting loads, repeated stresses apply on the rolling elements (balls) and raceways (rails), eventually causing scale-like flaking due to material fatigue. The total run distance until this flaking appears is defined as linear guide's "Life".
●Rated Life.
Rated life is a total distance 90% of linear guides reach without flaking when a group of the same guides are run under the same condition. The rated life can be calculated with basic dynamic load rating and the load applied on the guides as follows.
When using linear guides, load calculations are initially needed. It is not easy to calculate the loads during linear motion due to vibrations and shocks, as well as load distribution on the guides. Furthermore, operating environment temperature has large effect on life. When these conditions are taken in consideration, the calculations would be as follows.
  • L: Rated Life (Km)
  • fH: Hardness Factor (See Fig.1)
  • fT: Temperature Factor (See Fig.2)
  • fC: Contact Factor (See Table-1)
  • fW: Load Factor (See Table-2)
  • C: Basic Dynamic Load Rating (N)
  • P: Applied Load (N)
●Hardness factor (fH)

In using linear guides, the shaft that balls contact must have sufficient hardness, If adequate hardness cannot be obtained, load rating decreases and life will be reduced as a result.

●Temperature factor (fT)

When the temperature of linear guides exceed 100°C, hardness of blocks and rails will be reduced, causing reduction of life. Please compensate the life rating with temperature factor.
* Please use linear guides within temperature shown on product pages.

●Contact factor (fC)

Table-1. Contact Factor

Number of blocks installed on one rail and contact factor fC

1 1.00
2 0.81
3 0.72
4 0.66
5 0.61

In general, it is common to use 2 or more blocks on 1 rail. In such case, load applicable on each block would not be uniform due to machining variations. As the result, allowable load rating on each block would vary depending on the number of blocks used per rail. Please compensate the life rating with contact factor shown on Table-1.

●Load Factor (fW)

Table-2. Load Factor

Application condition fw
No external shocks or vibrations and
speed is low 15m/min or less
1.0-1.5
No significant shocks or vibration and
med. speed 60m/min or less
1.5-20
External shocks and vibrations exist
and the speed is high 60m/min or over
2.0-3.5

When calculating loads applicable on linear guides, other than the weight of the object, inertial force due to motion speeds, moment loads, and variations of each over time must also be obtained accurately. However, accurate calculation would be difficult due to repeated starts and stops and various shocks and vibrations. Therefore, the Load Factors shown in Table-2 are used to simplify the life calculations.

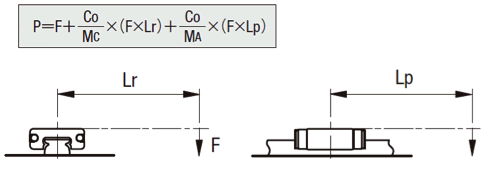
●Applicable load calculation method
When moment loads apply a block, use the following formula to convert the moment load to applicable load.
  • P: Applied Load (N)
  • F: Downward Load (N)
  • Co: Static Load Rating (N)
  • MA: Allowable Static Moment - Pitching Direction (N・m)
  • MC: Allowable Static Moment - Rolling Direction (N・m)
  • Lp: Load Point Distance (m) in Pitching Direction
  • Lr: Load Point Distance (m) in Rolling Direction

Back to page top

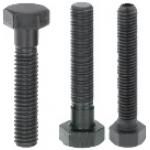
Stopper Bolts

Product name Stopper Bolts/Hexagon Socket/Fine Thread
Part number STRC8-35
* Orange colored cells in the table below indicate the part numbers used in this example.

Selection criteria

Prevent the linear guide from overrunning.

Back to page top

Available sizes

■Stopper Bolts

Material Hardness Surface Treatment
EN 1.7220 Equiv. 40-45HRC Black Oxide
Electroless Nickel Plating
EN 1.4006 Equiv. -

■Sizes and Dimensions

Thread Dia.
(Coarse)
Thread Dia.
(Fine)
Length in 5 mm increments
M3 x 0.5 - 10-30
M4 x 0.7 M4 x 0.5 15-60
M5 x 0.8 M5 x 0.5 15-60
M6 x 0.75 M6 x 0.75 20-60
M8 x 1.25 M8 x 0.75 25-60
M10 x 1.5 M10 x 1.0 30-70
M12 x 1.75 M12 x 1.0 35-80

Back to page top

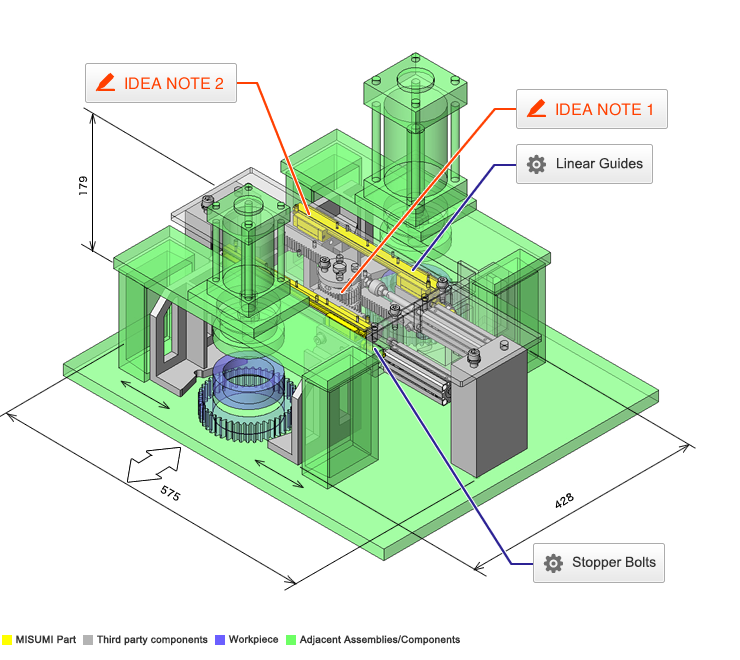
IDEA NOTE Anti-backlash Design

Elongated holes are made on one side and tapped holes are made on the other side in order to change the rotation speed slightly to reduce backlash.

IDEA NOTE Linear guides are used to guide the racks.

The linear guides are used as guides for the racks and the parallel hands.

  • TERMS AND CONDITIONS FOR USE OF CAD DATA
    Your access to the CAD data that MISUMI Corporation (hereinafter referred to as the Company) posts on this site (including 3D CAD data, intermediate 3D CAD data and 2D CAD data; hereinafter referred to as the Data) are of products manufactured and/or sold by the Company (hereinafter referred to as the Products) assumes that you have read and accepted these terms and conditions which govern your use of the Data. If you do not agree to these terms and conditions, you must stop using this website and the Data. You must not use the Data for any unlawful purpose or in any manner inconsistent with these terms and conditions.
    1. CAD Data
    The Data is prepared for assisting the Company's users in the CAD design process by providing dimensions and other Product information. In order to provide the best speed and stability working within this site, the Product drawings were simplified to reduce the size of the Data. For instance, some of the Products are shown without the oil groove shape, screws or spring shape. Also, please be aware that the tolerance, surface roughness and/or chamfer of the Data may vary from the actual Products.
    2. Disclaimer on Data
    While the Company has carefully prepared the Data, accuracy of the Data is not guaranteed and is subject to the variances as described above. The Company may also modify, add or delete the Data at any time without prior notice. The Company assumes no liability for any direct, indirect, consequential or special damages that you may claim resulted from your use of the Data or any changes to or deletions of the Data regardless of the reason. The Company provides no warranty as to the quality, accuracy, functionality, safety or reliability of the combination of Products and parts. Example applications and combinations of the Products are provided for illustrative purposes only.
    3. Copyright
    Copyrights to the content and the Data belong to the Company or the manufacturers of the Products. The said copyright is protected by the Copyright Act and international treaties. The use (including duplication, modification, uploading, posting, transmission, distribution, licensing, sales and publishing) of the Data except for the purpose to use the Data described above without prior approval of the Company is not allowed. The Data cannot be used for any purposes (including sales promotion) except for designing your machine. If you violate this provision or the laws or regulations, the Company may prohibit you from the use of the Data, the Company’s site and/or take legal action. So long as you comply with these terms and conditions, the Company grants to you a non-exclusive, non-transferable, revocable license to access and use the Data for the sole purpose of assisting you in designing machines that incorporate products.
    4. Disclaimer of Warranty
    ANY AND ALL CONTENT APPEARING ON THIS WEB SITE IS PROVIDED FOR INFORMATIONAL PURPOSES ONLY. THIS WEB SITE, ITS CONTENT AND ITS LINKS ARE PROVIDED ON AN "AS IS" AND "AS AVAILABLE" BASIS AND ARE USED ONLY AT YOUR SOLE RISK, TO THE FULLEST EXTENT PERMISSIBLE BY LAW. THE COMPANY DISCLAIMS ALL WARRANTIES, EXPRESS OR IMPLIED, OF ANY KIND, REGARDING THIS WEB SITE (INCLUDING ITS CONTENT, HARDWARE, SOFTWARE AND LINKS), INCLUDING AS TO FITNESS FOR A PARTICULAR PURPOSE, MERCHANTABILITY, TITLE, NON INFRINGEMENT, RESULTS, ACCURACY, COMPLETENESS, ACCESSIBILITY, COMPATIBILITY, SECURITY AND FREEDOM FROM COMPUTER VIRUS. THE COMPANY WILL NOT BE LIABLE FOR ANY DAMAGES OR LOSSES, INCLUDING DIRECT, INDIRECT, CONSEQUENTIAL, SPECIAL, INCIDENTAL OR PUNITIVE DAMAGES AND/OR LOST PROFITS, IN CONNECTION WITH USE OF THE INTERNET, THIS WEB SITE, ITS CONTENT OR ITS LINKS
    Further, the Company will not be liable to you for any failure or delay by the Company to provide access to the Data or any of its obligations under these terms and conditions where such failure or delay is the direct or indirect result of any circumstances beyond the Company's reasonable control (and the Company's obligations will be suspended for the duration of such circumstances).
    5. Policy of Third Parties
    You may be required to separately agree to third party's policies if you use third party software to create or browse the Data or use a third party’s CAD data. In this case, the Company does not assume any responsibility for defects of such CAD data or the software of the third party or violation of their rights. Understand them before use.

    CAD Data Download (Unit Assembly)

    CAD Data Download: File Format
    生成

    Thank you for downloading the data.

    Click the Good IDEA! button when this application example is helpful.


    This data is utilized in order to list more useful application examples in the future.

    Cautions on the CAD data

    1. Assembly data shows the assembly drawings in the concept design phase. The sole purpose of the data is to explain the structure and functionality of the assembly and is not considered nor to be used as a final design.
      You will need to edit the Data so that it meets your specific design conditions.
    2. The CAD data unit assembly consists of sub-assemblies.
      Each sub-assembly unit can be used as it is or can be edited.
    3. * The part in the frame is a sub-assembly unit.

    4. The Data for fabricated parts is based on easy-to-edit dimensions and shapes in sketches and histories.
    5. The Data including the third-part components are made by the Company.

    Back to top

  • * Unit assembly CAD data consists of some sub-assemblies.
       Each sub-assembly unit can be used as it is or can be edited.

Application Overview

Purpose

  • The mechanism centers the workpieces using parallel hands operated by a rack and pinion set.
    Both sets of hands have a drive source and are operated independently. (Each workpiece placed/removed from the table by a robot)

Target workpiece

  • Shape: Nylon gear
    Size: Ø141mm 
    Weight: 1kg

Design Specifications

Operating Conditions or Design Requirements

  • Movable range of the hands: 60mm
  • External dimensions:w428 x D575 x H179mm

Required Performance

  • Weight of workpiece: 10N
    Weight of hands: 80N

Selection Criteria for Main Components

  • The maximum friction coefficient of the centering table is 0.2. Select a cylinder whose output is 100N or more to move the hands and the workpiece on the table.

Design Evaluation

Verification of main components

  • Compare and validate the load output and cylinder output
    • Calculation of the load output:
      Workpiece 10N x 0.2 (friction coefficient) = 2N
      Hands 80N x 0.1 (friction coefficient) = 8N, Total: 10N
      Cylinder out ( = 100N or more) > 10N = load output

Other Design Consideration

  • Design the two-tier pinion mechanism so it can be supported by one shaft.

Explore Similar Application Examples

Page - / -

Part List

No. Part Name Sample picture MISUMI Part Number
For Price and Days to ship click on Part No.
Quantity
1 Linear Guides SX2R24-280 2
2 Stopper Bolts STRC8-35 2
3 Dowel Pins MS5-10 4
4 Bearing Nut FUNT15 1
5 Ball Bearing B6902ZZNR 4
6 Deep Groove Ball Bearings B6902ZZ 2
  • The part list above contains only MISUMI parts.
    The list of parts and machined products of other manufacturers than MISUMI can also be downloaded by part list download (CSV).
  • TERMS AND CONDITIONS FOR USE OF CAD DATA
    Your access to the CAD data that MISUMI Corporation (hereinafter referred to as the Company) posts on this site (including 3D CAD data, intermediate 3D CAD data and 2D CAD data; hereinafter referred to as the Data) are of products manufactured and/or sold by the Company (hereinafter referred to as the Products) assumes that you have read and accepted these terms and conditions which govern your use of the Data. If you do not agree to these terms and conditions, you must stop using this website and the Data. You must not use the Data for any unlawful purpose or in any manner inconsistent with these terms and conditions.
    1. CAD Data
    The Data is prepared for assisting the Company's users in the CAD design process by providing dimensions and other Product information. In order to provide the best speed and stability working within this site, the Product drawings were simplified to reduce the size of the Data. For instance, some of the Products are shown without the oil groove shape, screws or spring shape. Also, please be aware that the tolerance, surface roughness and/or chamfer of the Data may vary from the actual Products.
    2. Disclaimer on Data
    While the Company has carefully prepared the Data, accuracy of the Data is not guaranteed and is subject to the variances as described above. The Company may also modify, add or delete the Data at any time without prior notice. The Company assumes no liability for any direct, indirect, consequential or special damages that you may claim resulted from your use of the Data or any changes to or deletions of the Data regardless of the reason. The Company provides no warranty as to the quality, accuracy, functionality, safety or reliability of the combination of Products and parts. Example applications and combinations of the Products are provided for illustrative purposes only.
    3. Copyright
    Copyrights to the content and the Data belong to the Company or the manufacturers of the Products. The said copyright is protected by the Copyright Act and international treaties. The use (including duplication, modification, uploading, posting, transmission, distribution, licensing, sales and publishing) of the Data except for the purpose to use the Data described above without prior approval of the Company is not allowed. The Data cannot be used for any purposes (including sales promotion) except for designing your machine. If you violate this provision or the laws or regulations, the Company may prohibit you from the use of the Data, the Company’s site and/or take legal action. So long as you comply with these terms and conditions, the Company grants to you a non-exclusive, non-transferable, revocable license to access and use the Data for the sole purpose of assisting you in designing machines that incorporate products.
    4. Disclaimer of Warranty
    ANY AND ALL CONTENT APPEARING ON THIS WEB SITE IS PROVIDED FOR INFORMATIONAL PURPOSES ONLY. THIS WEB SITE, ITS CONTENT AND ITS LINKS ARE PROVIDED ON AN "AS IS" AND "AS AVAILABLE" BASIS AND ARE USED ONLY AT YOUR SOLE RISK, TO THE FULLEST EXTENT PERMISSIBLE BY LAW. THE COMPANY DISCLAIMS ALL WARRANTIES, EXPRESS OR IMPLIED, OF ANY KIND, REGARDING THIS WEB SITE (INCLUDING ITS CONTENT, HARDWARE, SOFTWARE AND LINKS), INCLUDING AS TO FITNESS FOR A PARTICULAR PURPOSE, MERCHANTABILITY, TITLE, NON INFRINGEMENT, RESULTS, ACCURACY, COMPLETENESS, ACCESSIBILITY, COMPATIBILITY, SECURITY AND FREEDOM FROM COMPUTER VIRUS. THE COMPANY WILL NOT BE LIABLE FOR ANY DAMAGES OR LOSSES, INCLUDING DIRECT, INDIRECT, CONSEQUENTIAL, SPECIAL, INCIDENTAL OR PUNITIVE DAMAGES AND/OR LOST PROFITS, IN CONNECTION WITH USE OF THE INTERNET, THIS WEB SITE, ITS CONTENT OR ITS LINKS
    Further, the Company will not be liable to you for any failure or delay by the Company to provide access to the Data or any of its obligations under these terms and conditions where such failure or delay is the direct or indirect result of any circumstances beyond the Company's reasonable control (and the Company's obligations will be suspended for the duration of such circumstances).
    5. Policy of Third Parties
    You may be required to separately agree to third party's policies if you use third party software to create or browse the Data or use a third party’s CAD data. In this case, the Company does not assume any responsibility for defects of such CAD data or the software of the third party or violation of their rights. Understand them before use.

    CAD Data Download (Unit Assembly)

    CAD Data Download: File Format
    生成

    Thank you for downloading the data.

    Click the Good IDEA! button when this application example is helpful.


    This data is utilized in order to list more useful application examples in the future.

    Cautions on the CAD data

    1. Assembly data shows the assembly drawings in the concept design phase. The sole purpose of the data is to explain the structure and functionality of the assembly and is not considered nor to be used as a final design.
      You will need to edit the Data so that it meets your specific design conditions.
    2. The CAD data unit assembly consists of sub-assemblies.
      Each sub-assembly unit can be used as it is or can be edited.
    3. * The part in the frame is a sub-assembly unit.

    4. The Data for fabricated parts is based on easy-to-edit dimensions and shapes in sketches and histories.
    5. The Data including the third-part components are made by the Company.

    Back to top

Back to top